Devices
A device is any sensor, meter, tracker, or actuator that sends data into ioX-Pulse over the LoRaWAN network. This page walks through how to register a device, assign it to a sub-account, monitor its health, and configure how its data is displayed.
Where to find it: Sidebar → Fleet → Device List tab.
Inventory vs. Fleet
ioX-Pulse separates devices into two states:
| State | Where it lives | What it means |
|---|---|---|
| Inventory | Inventory page | Registered to your partner account but not yet active. Doesn't count toward your device license. |
| Fleet | Fleet → Device List | Assigned to a sub-account and live on the network. Sending and receiving data. |
You'll typically register a batch of devices to inventory first, then assign them to sub-accounts as customers come online.
What a device in inventory can't do
A device in inventory is registered but not on the network, so it sends no data. Archived devices behave the same way. Until the device is assigned:
- It isn't offered when you bind a dashboard widget, choose devices in Analytics, pick a workflow target, add devices to a multi-cast group, or filter a webhook by device. Inventory lists, exports, and the API still include it, with its status.
- Its detail page keeps only the Configuration tab (for RF sensors, the gateway pairing) and a notice. The data tabs come back once it is assigned.
- Anything already set up against it stays saved but shows it as not available. Dashboard widgets say Device not available, controls are disabled, and settings list it as Unavailable device; see When a device is not available. Workflows that target it are tagged Unavailable and don't fire, Send downlink actions aimed at it are skipped, and multi-cast sends skip it.
- Integrations receive no events for it. The API lists it with
status: "inventory"and no live values, and its data routes answer404; see Devices in inventory.
Registering a device
Devices are added to inventory first.
- Open Inventory from the sidebar.
- Click Register device.
- Fill in the required fields:
- DevEUI, the 16 hex character identifier printed on the device or its packaging.
- Name, a short label that appears across the device list and dashboards.
- Device profile, which picks the decoder and data fields used to interpret uplinks. See Device Profiles.
- Frequency, the LoRaWAN frequency plan printed on the device label or datasheet (EU868, US915, AU915, AS923, or IN865). Only plans your tier permits are selectable.
- AppKey, the 32 hex character application key from the device manufacturer.
- Optionally fill in:
- Description, free-form notes about this unit (up to 200 characters).
- Serial number, the manufacturer sticker or order number.
- Type, one of Sensor, Controller, or Beacon.
- JoinEUI, the 16 hex character join EUI when the manufacturer uses a custom one.
- AT PIN, the device's AT command console PIN. Used for field service and reprovisioning.
- OTA PIN, the device's over the air firmware update PIN.
- Click Register.
DevEUI conflict? Each DevEUI must be globally unique. If the DevEUI is already registered (either in ioX-Pulse or elsewhere on the underlying network), you'll see a conflict warning. Contact support if you believe the conflict is incorrect.
AT PIN and OTA PIN are stored encrypted at rest. Use the View keys and PINs action on the device record (Inventory list, or the device detail page) to retrieve them later when you need to help an end user troubleshoot over Bluetooth or AT console.
Permission required: Partner Admin.
Bulk registering devices from a CSV
For batches of more than a handful of devices, use the Import button on the Inventory page.
- Open Inventory and click Import.
- Pick the Device profile that applies to every row in the batch. The picker is searchable, so type part of a profile name or region to narrow a long list. (One profile per import. If you're importing mixed product types, do one import per type.)
- Click Download CSV template to get a header row with all supported columns and one example line. The columns match the Register Device fields:
- Required:
DevEUI,Name,Frequency,AppKey - Optional:
Description,Serial number,Type,JoinEUI,AT PIN,OTA PIN,Claimable,Reserved for - The
Claimablecolumn takestrueorfalse(defaults tofalse). A row markedtruemust also have aSerial number, since claiming matches on it. See Making devices available to claim. - The
Reserved forcolumn takes the name of one of your customer sub-accounts. The name must match exactly one sub-account; if two sub-accounts share the name, the row is rejected so the reservation never lands on the wrong customer. See Reserving devices for a customer.
- Required:
- Open the template in your spreadsheet tool, paste your device list in, and save as CSV. If a device name contains special characters such as a long dash, save as 'CSV UTF-8' so they import cleanly (the import will still auto-convert other encodings, but UTF-8 is the safe choice).
- Click Select CSV file and pick your saved file.
- The preview table shows each row with a Ready or Error badge. Hover an error to see why it was rejected (bad DevEUI format, missing AppKey, frequency not enabled on your tier, etc.). If your file wasn't saved as UTF-8, a banner notes that we converted it; check the Name column reads correctly before importing.
- Click Import N devices to commit. Rows with errors are skipped.
- The results screen shows which rows were imported and which failed. Fix the rejected rows in your CSV and re run the import for just those.
Batch size: up to 1000 devices per import. Larger batches should be split across multiple files.
Duplicate DevEUIs within one file are rejected automatically. DevEUIs that already exist in your inventory are also rejected with a DevEUI already registered message. Fix the source CSV before retrying.
Permission required: Partner Admin.
Exporting the inventory to CSV
The Export button on the Inventory page downloads everything you can see in the current table (search and filters applied) as a CSV file.
The export includes the AppKey column in plain text. Treat the file as sensitive: it is enough to provision the listed devices on any LoRaWAN network. AT PIN and OTA PIN are not included; use View keys and PINs to retrieve those individually.
The export also carries the Claimable and Reserved for columns, and an exported file can be re-imported: the import recognizes the export's report-only columns (Status, Sub-account, Last seen, and so on) and skips them with a note in the preview.
The file is named pulse-inventory-YYYY-MM-DD.csv. Every export is audit logged.
Permission required: Partner Admin.
Connecting more devices to an existing profile
Once you have a Device Profile set up for a product line, every subsequent device of that type reuses the same profile:
- Register each new device with the DevEUI and AppKey from the manufacturer.
- Select the existing Device Profile from the dropdown rather than creating a new one.
- Optionally apply calibration per device if individual sensors need fine-tuning.
The profile carries the decoder, field definitions, and Primary/Secondary display defaults, so new devices look right on the dashboard from their first uplink.
Assigning a device to a sub-account
A device only starts sending data once it's assigned to a sub-account.
- From Inventory, find the device and click Assign from the row's action menu.
- Pick the destination sub-account. If the device is reserved for a customer, that customer is pre-selected; picking a different one shows a warning but is allowed, and the reservation clears on assign.
- Click Assign.
The device is provisioned on the LoRaWAN network in the background. If provisioning hasn't finished yet, you'll see a "Pending sync" indicator. It usually clears within a minute. You can retry from the device's Configuration tab if it doesn't.
Moving a device back to inventory
When a customer returns hardware, churns, or you need to redeploy a unit, you can pull an assigned device back into your Inventory without deleting it:
- From Fleet > Device List, open the row's action menu and choose Move to inventory.
- Or open the device's detail page and click Move to inventory in the header.
This works for LoRaWAN and cellular devices. What happens:
- LoRaWAN devices are removed from ioX-Bridge. The AppKey is recovered onto the device record automatically, so the device is ready to reassign without re-entering it; it re-joins the network the next time it is assigned and powered on. Cellular devices stay registered for connectivity and simply stop reporting under the customer account.
- All of the device's data is permanently deleted: readings and history, location history, events, downlink and command history, certifications, calibrations, set values, and its device dashboard. Only its registration details are kept (name, DevEUI, serial number, profile, and keys); for RF sensors, the gateway pairing is kept too. A future assignee starts with a clean history and can never see the previous customer's data. The audit log keeps the record of the move. This cannot be undone.
- Active alarms on the device are cleared, and any workflows the customer created targeting this specific device are disabled (with an audit entry).
- The Available to claim flag is cleared, so a pulled-back device can't be silently re-claimed. Re-flag it if you want it claimable again. Any Reserved for earmark was already cleared when the device was assigned; the returned device arrives in Inventory unreserved.
- Dashboard widgets, visualizations, webhook filters, and your own workflows that referenced the device keep their settings and show it as not available until it is assigned again; see What a device in inventory can't do.
- If your plan limits how many devices you can hold in inventory, the move is refused when it would go over that limit. Delete devices you no longer need, or ask for a higher limit.
This is subscription-gated. The action is available when the Inventory module is enabled on your subscription. If you don't see it, contact support.
Permission required: Partner Admin.
Reserving devices for a customer
When a batch of hardware in your Inventory is meant for a specific customer, mark it Reserved for that customer so the earmark is visible to everyone on your team:
- The reservation shows in its own column on the Inventory table, and the Reserved filter narrows the table to one customer's devices (or to unreserved stock).
- When you assign a reserved device, the reserved customer is pre-selected in the Assign dialog. You can still pick a different customer; the dialog warns you, and the reservation clears on assign either way.
- If a reserved device is also available to claim, only the reserved customer can claim it. Anyone else entering the DevEUI and serial gets the same "no match" error as for any unclaimable device.
There are three ways to reserve devices:
- One device - open the device from Inventory, Edit, and pick a customer under Reserved for.
- In bulk - select rows in Inventory and choose Reserve for customer (see Bulk actions on inventory).
- On import - fill the
Reserved forcolumn with the customer sub-account's name (see Bulk registering devices from a CSV).
A reservation is an earmark, not a wall: it never consumes a license, and it clears automatically when the device is assigned or claimed. Deleting a sub-account clears any reservations pointing at it.
Permission required: Partner Admin.
Making devices available to claim
Assigning is one way a device reaches a customer. Claiming is the other: instead of you picking the destination, the customer adds a device they physically hold by entering its DevEUI and serial number, both printed on the device label. This is handy when you ship pre-provisioned hardware and let customers bring it online themselves.
A device can be claimed only when you've marked it available to claim. Marking a device claimable requires a serial number on the record, because claiming matches on DevEUI and the exact serial (case-sensitive) as a two-factor check. The device stays in your Inventory until someone claims it; on a successful claim it provisions on the network and becomes assigned to that customer, exactly as if you'd assigned it yourself.
There are three ways to mark devices claimable:
- One device - open the device from Inventory, Edit, and turn on Available to claim.
- In bulk - select rows in Inventory and choose Set claimable (see Bulk actions on inventory).
- On import - set the
Claimablecolumn totruein the CSV (see Bulk registering devices from a CSV).
This is tier-gated. A customer can only claim when Sub-account device claiming is enabled on their sub-account tier (see Tier features and quotas). Marking devices claimable does nothing until that tier feature is on. For what the customer sees, see Claiming a device or gateway.
Claiming is one-time and exact. The serial must match exactly, including case. Once a device is claimed it leaves your Inventory and belongs to that customer; to move it elsewhere you unassign it (which returns it to Inventory and clears the claimable flag) and start again.
Claimable + Reserved for = a customer-exclusive claim. If a claimable device is also reserved for a customer, only that customer can claim it, even if someone else knows the DevEUI and serial.
Permission required: Partner Admin.
Bulk actions on inventory
When you're working with a batch (CSV import you just landed, a stack of devices for the same customer), use the row checkboxes to act on many at once.
- Tick the row checkboxes for the devices you want to act on. A bar appears above the table showing N devices selected.
- Choose an action:
- Assign to sub-account, provisions every selected device to the same customer sub-account. Each device is provisioned individually on the LoRaWAN network, and the results panel shows which rows succeeded and which need a retry.
- Batch update, sets the same Frequency or Type across every selected device. Useful for fixing a CSV import that had the wrong frequency column.
- Set claimable, marks every selected device available (or not available) to claim. See Making devices available to claim. Rows without a serial number can't be made claimable and are reported back to you.
- Reserve for customer, earmarks every selected device for the same customer sub-account (or clears existing reservations). See Reserving devices for a customer.
- Click Clear selection to start over.
Selection covers the current page only. Paging to a different page clears the selection so it's always clear what you're acting on.
Permission required: Partner Admin.
Filtering inventory
The Inventory page has four quick filters above the table:
- Search, matches against DevEUI, serial number, and name.
- Type, narrows to Sensor, Controller, or Beacon.
- Profile, narrows to a single device profile.
- Reserved, narrows to devices reserved for one customer, or to unreserved stock.
Filters combine, and the Export button always exports what you're currently looking at. Combine filters with the row checkboxes to bulk update a slice of inventory in one shot.
Viewing keys and PINs for a device
The View keys and PINs action (Inventory list row menu, or the device detail page header) opens a reveal modal that shows the JoinEUI, AppKey, AT PIN, and OTA PIN for the selected device, so these stay available after the device is assigned.
- For inventory devices, all three are read straight from the partner record.
- For assigned devices, the AppKey is pulled live from the LoRaWAN network and the PINs are read from the partner record.
Every reveal is audit logged with the operator's identity and the time. Treat the values as sensitive: don't paste them into chat tools or unencrypted email.
Permission required: Partner Admin.
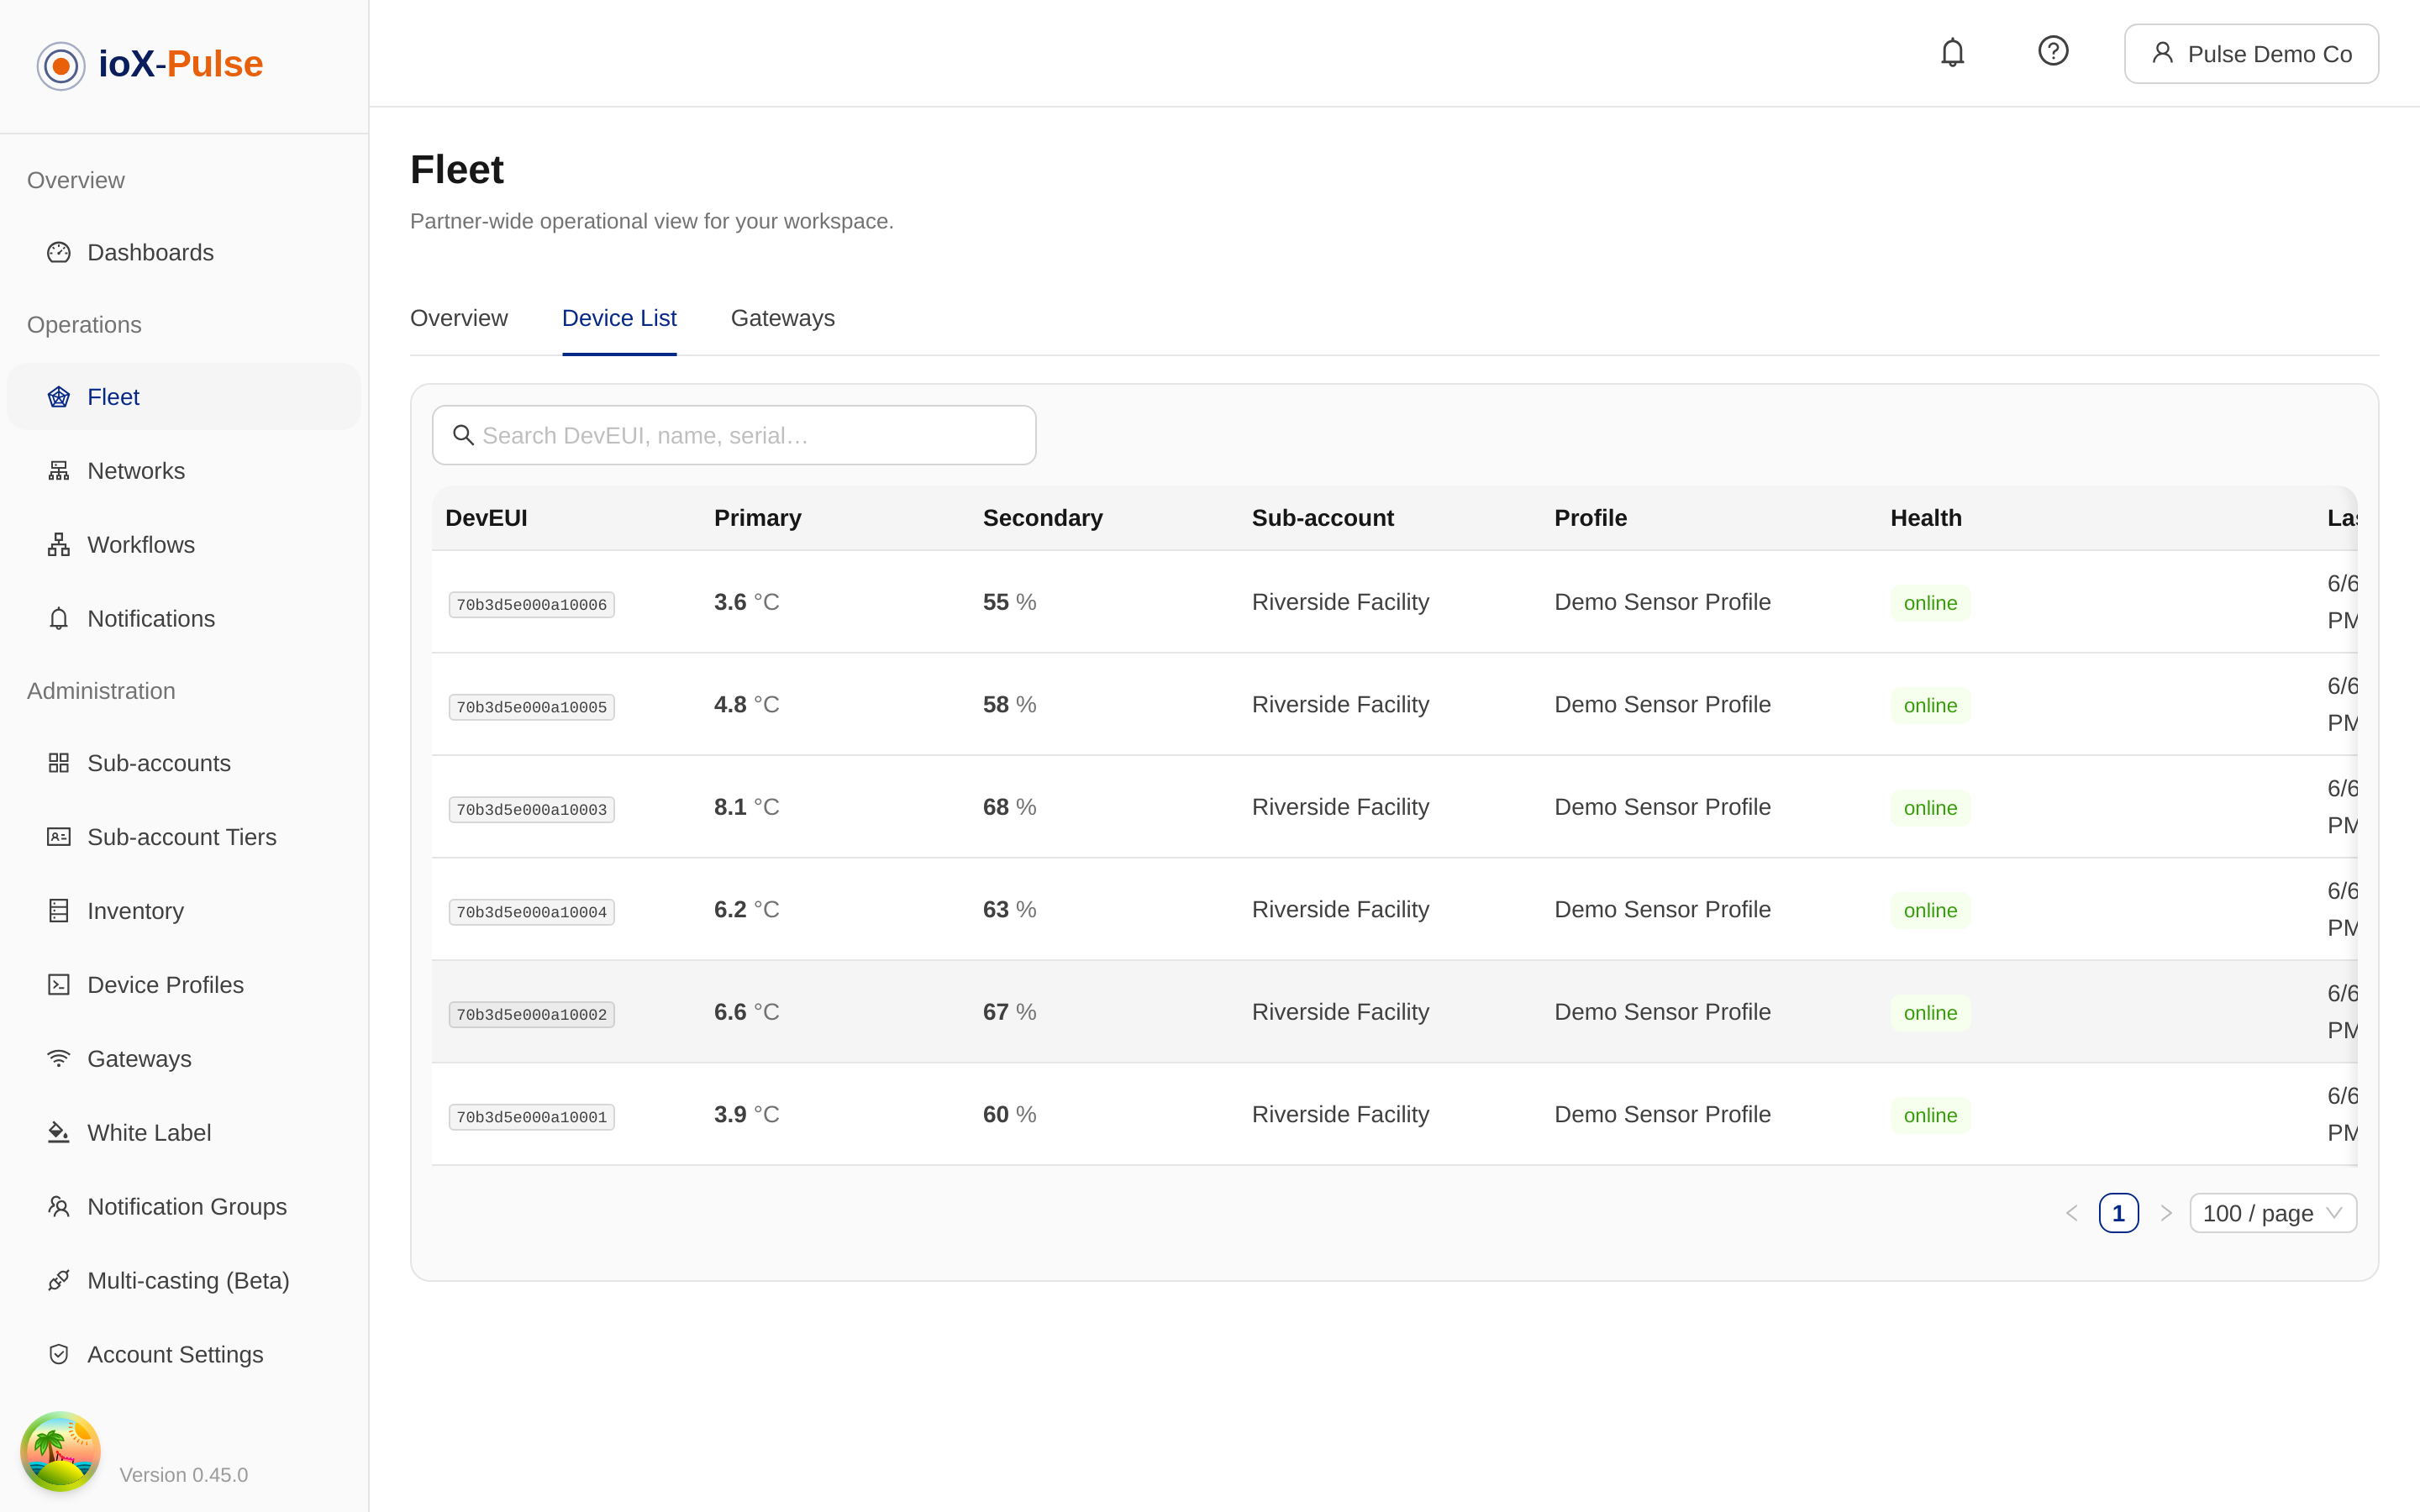
The device list
The Device List shows every assigned device across your partner account.
Columns:
- DevEUI, the unique device identifier.
- Serial, the device's serial number (from the label). Blank if not recorded.
- Name, a friendly name. Falls back to DevEUI if blank.
- Primary field / Secondary field, the two most important data values for this device (e.g. temperature, battery). Configured per device on the Fields tab.
- Sub-account, which sub-account the device belongs to. Hidden if you're scoped into a single sub-account.
- Tags, the free-text labels set on the device's record. Blank if none.
- Health, at-a-glance chips for online/offline status, rate-limit warnings, and certification state.
- Signal, the device's latest Signal Quality as a percentage and band (Excellent, Good, Fair, Poor). Click the column header to sort, so the weakest-connected devices rise to the top.
- Last seen, when the device last sent an uplink.
- Last gateway, the gateway the device's most recent uplink came through (for LoRaWAN, the strongest receiver when several heard the frame). Blank for cellular and Blues Notehub devices, which connect without a gateway. The name links to the gateway's detail page when it is in your gateway list.
By default the table shows DevEUI, Serial, Name, Primary/Secondary, Health, Signal, and Last seen; the rest (Sub-account, Tags, Last gateway, and, where enabled, Site and Network) sit behind the Columns button above the table. Every user picks their own set: show, hide, and drag to reorder, and the layout saves to their profile per workspace. See Choosing your columns for the walkthrough.
The list is sorted online devices first, then by most recently seen, so the freshest live devices sit at the top. Health and last-seen update live as uplinks arrive, with no need to refresh the page.
Filters: search by DevEUI, name, serial number, or tag; a Health quick filter that narrows the list to Online, Offline, Alerting, or Warning devices (matching the health chips); a Sub-account quick filter to narrow the list to one sub-account's devices, or to devices kept at the partner level (No sub-account); and a Network quick filter when your workspace uses networks. Page size adjustable from 25 to 200 rows. Search, filters, and page are remembered while users move around the app and are carried in the URL, so a filtered view can be bookmarked or shared; see Your search and filters stay put.
Click Export to download the current Device List as a CSV file that opens in Excel and other spreadsheet apps. The export matches the table: it includes only the rows that pass the current search and filters, and only the columns shown through the Columns button, in the same order. Hidden columns and devices outside the filtered results are not included.
While the Sub-account filter is active, the bulk bar's Apply to all matching filter action is unavailable; use Apply to selected instead.
The Fleet Map tab plots every assigned device and gateway that has a location on one map, with state-colored clusters. See Finding your devices for how it reads; locations are set on the device's or gateway's Location tab.
Device detail
Click any device in the list to open its detail page.
The page header shows the device name, its health chips, the DevEUI, the serial number (when one is on record), and its assignment status. It also shows the device's linked network (when it belongs to one) and the sub-account it's assigned to. As with the device list, the sub-account tag is hidden when you're scoped into a single sub-account, since you're already working inside it.
The detail page has seven tabs. A device in inventory or archived shows only its Configuration tab and a notice; see What a device in inventory can't do.
Dashboard
A device-specific dashboard you can customize with widgets: gauges, charts, status indicators, etc. See Dashboards for widget configuration.
Location
A map for placing the device, matching the gateway's Location tab. Set the position by searching an address or by dragging the pin; the latitude, longitude, and a formatted address are saved together. See Setting a location by address for the full how-to.
Configuration
Edit the device's name, type, profile, and behavior settings. Partner Admins and Sub-account Admins can edit. Other users see read-only.
The serial number is editable here too, but by Partner Admins only, since it doubles as the second factor when a customer claims a device. Sub-account Admins see it read-only. Changing it after a device is claimed is fine and doesn't affect the existing assignment.
Events
Live feed of uplinks, downlinks, and system events for this device. Useful for confirming the device is sending data and that its profile is decoding payloads correctly. A red badge on an uplink means decoding failed, usually a profile mismatch. If your tier has multi-site, a Site column shows where the device was when each reading arrived, see Sites.
Each uplink shows its radio quality. RSSI and SNR are the raw signal-strength and signal-to-noise figures, and Signal Quality rolls both into a single 0-100% reading with a plain-language band (Excellent, Good, Fair, Poor) so anyone can judge link health at a glance. RSSI, SNR, and Signal Quality are also available as fields you can put on dashboard widgets and use in workflow conditions, on every device, with no decoder setup. See System fields.
Downlinks
Send commands back to the device. Sending is available to Partner Admins by default; Sub-account Admins can send downlinks if your tier includes the feature. The tab's History section is visible to every role that can open the device: it lists everything sent in the last 12 months with sender attribution (person, workflow, multicast group, API key, or public dashboard) and delivery status, and exports to CSV. See Downlink history for the status vocabulary.
Set a downlink expiry on the device's Configuration tab to have a queued command discarded if it can't be delivered within a chosen window, rather than firing late when an offline device reconnects. Leave it blank to never expire. See Downlink expiry for how it behaves; over the API, the same control is the per-call expiresInSeconds option (see API endpoints).
Fields
The catalog of data fields exposed by the device's profile. Here you can:
- Set Primary and Secondary fields, the two values that show on the Device List and on widgets that don't specify a field.
- Set a static field's value with Set value. For a static field (a profile data field with a fixed value and no source path, such as tank capacity), this gives this device its own value, overriding the profile default. It's configuration, not a reading: no chart point, no rules fire. A device showing the profile default is tagged
default; one with its own value is taggeddevice value. Reset to default from the same dialog. Date fields open a date picker here; this is where a device gets its install or service date (see Dates in formulas). - Apply calibration, correcting a live reading with a linear transform (e.g. shift a temperature reading by -0.5°C) from the point you choose: new readings only, or stored readings back to a date. Calibration is two-way: a "Set value" action reverses the transform so the device sees a raw value matching what you intended. See Calibration.
- Manually set a value (admins only), injecting a synthetic reading on a live sensor field. Rules fire as if the device sent it. Useful for testing alert flows.
Certification
Track compliance evidence (calibration certificates, installation records) attached to the device. Tier-gated, talk to your account manager if you don't see this tab.
Health indicators explained
The health chips shown in both the list and the device header use these definitions:
| Chip | What it means |
|---|---|
| Online | Last uplink within the device's offline threshold (30 minutes by default; adjustable per device on the Configuration tab). |
| Offline | No uplink within the device's offline threshold. |
| Alerting / Warning / Info | An active alert set by a workflow's Set status action. Clears when the linked notification is acknowledged or the workflow's auto-clear timer runs out. |
| Rate-limited | Device is sending faster than the network's fair-use policy allows. Usually a misconfigured device. |
| Certification expiring | A linked certification document is within 30 days of expiry. |
| Decode error | The latest uplink couldn't be decoded against the assigned profile. |
Removing a device
Removing a device is permanent. It deletes the device record, removes it from any dashboards that referenced it, and detaches it from the underlying network. Historical telemetry is preserved separately.
- Open the device detail page.
- Click Remove device in the Configuration tab.
- Type the device name to confirm.
If you want to keep the device record but stop it from sending under a customer account, use Move to inventory instead. Note that moving a device to inventory permanently deletes all of its data.
Permission required: Partner Admin.
Frequently asked
Why is a device showing as offline when I can see uplinks in the Events tab?
Health is calculated against the profile's expected uplink interval. If the profile says the device should report every 5 minutes and it's been 16 minutes, it's flagged offline. Adjust the expected interval on the profile if your device intentionally reports less often.
Can I move a device between sub-accounts?
Yes. Move it to inventory, then assign it to the new one. All of the device's data is permanently deleted when it moves to inventory, so it starts with a clean history for the new customer; the previous customer's data is never visible to the new one.
A device disappeared from the list.
Most likely it was unassigned or moved to a different sub-account. Check Inventory first. If you're scoped into a single sub-account, you won't see devices assigned to other subs.